xv6项目学习
前言:本篇主要记录MIT6.08s课程的学习中较为详细的实操内容,本人学习该课程的步骤为:
一、环境搭建和配置
-
在服务器 39.106.136.32 root用户下新建用户os
1
2
adduser os
给用户os分配sudo权限: usermod -aG sudo os -
配置ssh登陆
-
在本地 ~/.ssh/config 中添加如下配置:
1
2
3
Host os
HostName 39.106.136.32
User os -
添加公钥:
ssh-copy-id os
-
-
验证服务器环境:
cat /etc/debian_versionbullseye/sid
-
准备在Linux系统上进行跨平台的软件开发和测试环境:
-
sudo apt-get install git build-essential gdb-multiarch qemu-system-misc gcc-riscv64-linux-gnu binutils-riscv64-linux-gnugit: 是一个分布式版本控制系统,用于跟踪和协调多人之间的代码变更。build-essential: 包含了编译软件所需的基本编译环境,例如gcc、g++、make等工具。gdb-multiarch: 是GNU Debugger的多架构版本,用于调试各种不同架构下的程序。qemu-system-misc: QEMU是一个通用的开源机器模拟器和虚拟化器,qemu-system-misc包含了QEMU支持的其他系统架构的模拟器,可以模拟多种处理器架构。gcc-riscv64-linux-gnu: 是针对RISC-V 64位处理器架构的Linux目标的GNU C编译器。它允许开发者编译出可以在RISC-V 64位架构上运行的程序。binutils-riscv64-linux-gnu: 包含GNU二进制工具集,例如链接器和汇编器,也是为了支持RISC-V 64位架构。
-
此时我们会发现qemu-system-misc的安装出了点问题,提示未安装成功,运行如下命令
1
2
sudo apt-get remove qemu-system-misc
sudo apt-get install qemu-system-misc=1:4.2-3ubuntu6 -
检查qemu-system-misc是否安装成功并查看其版本号
1
dpkg -l | grep qemu-system-misc
ii qemu-system-misc 1:4.2-3ubuntu6 amd64 QEMU full system emulation binaries (miscellaneous)
安装成功!
-
检测安装
1
riscv64-unknown-elf-gcc --version
riscv64-unknown-elf-gcc () 9.3.0
Copyright © 2019 Free Software Foundation, Inc.
This is free software; see the source for copying conditions. There is NO
warranty; not even for MERCHANTABILITY or FITNESS FOR A PARTICULAR PURPOSE.
1
qemu-system-riscv64 --version
QEMU emulator version 4.2.1 (Debian 1:4.2-3ubuntu6.28)
Copyright © 2003-2019 Fabrice Bellard and the QEMU Project developers
-
进行代码版本控制并获取xv6代码
具体来说在github新建仓库,并克隆MIT的实验代码,可以参考:
-
编译和运行xv6
-
进入 xv6-labs-2020目录
-
sudo make qemu
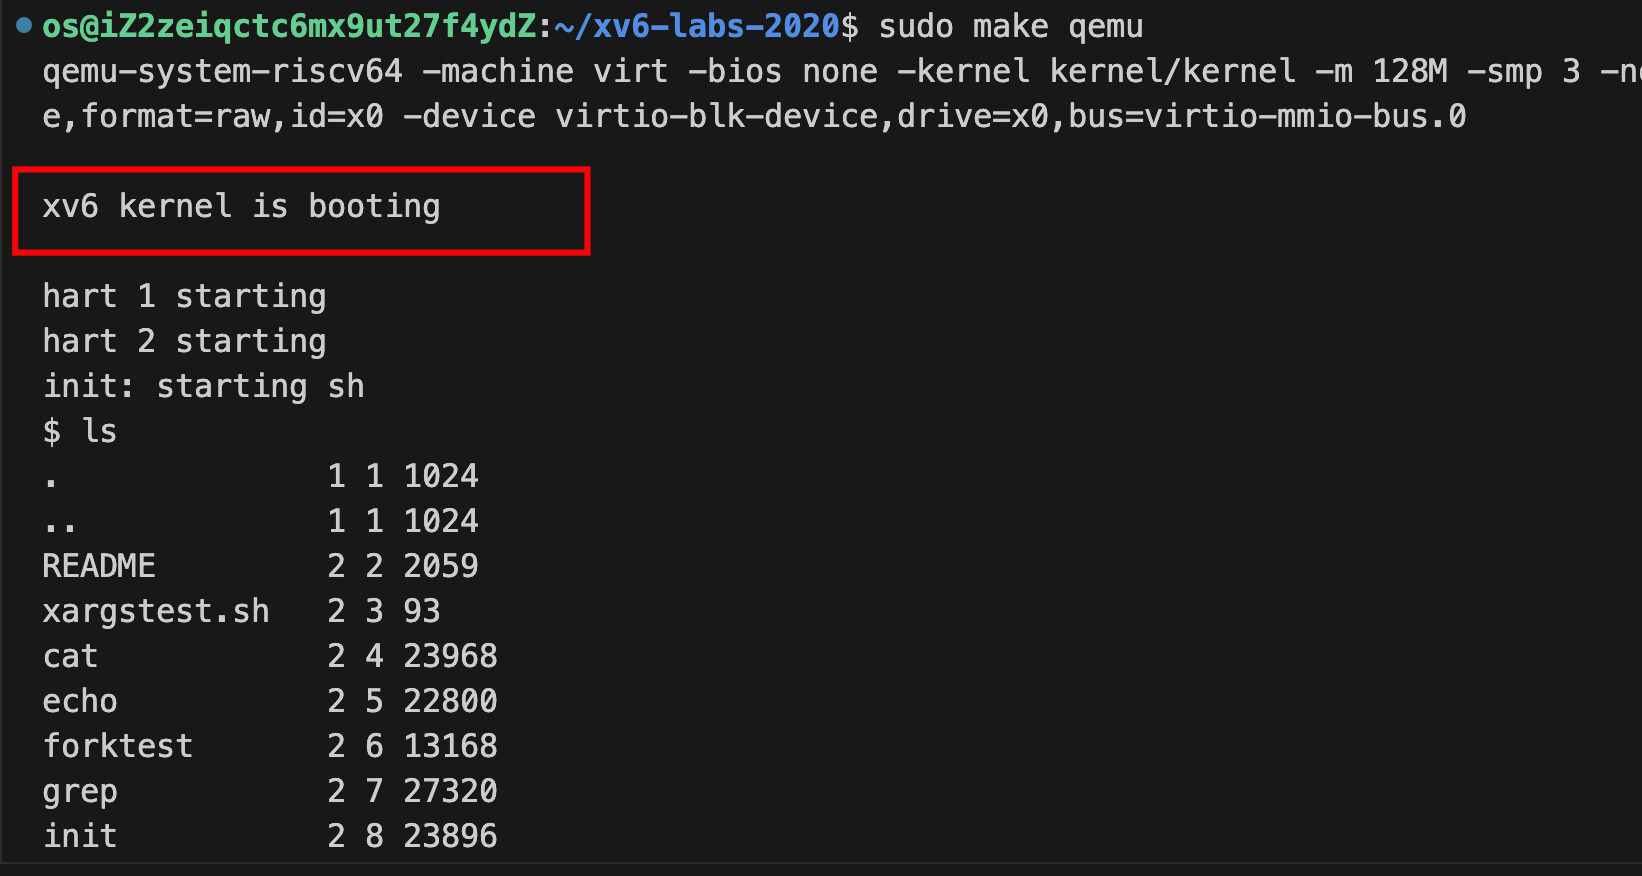
-
退出qemu 先Ctrl + a 后 x
-
-
二、操作系统接口:一些系统调用
1 课程演示
-
切换到util分支
1
git checkout util
-
进入到xv6-labs-2020目录
1
cd xv6-labs-2020
-
启动xv6
1
make qemu
-
在user目录下增加copy.c文件
1
2
3
4
5
6
7
8
9
10
11
12
13
14
15
16
17
18
19
20
21
22
// copy.c: 将控制台输入内容输出到控制台
int
main()
{
char buf[64];
while(1){
//从console读取输入,通过system call的read函数实现
int n = read(0, buf, sizeof(buf)); // 0表示标准输入,返回读取的字节数
//无输入结束程序
if(n <= 0)
break;
//将console输入输出到控制台,通过system call的write函数实现
write(1, buf, n); // 1表示标准输出,n表示输出的字节数
}
exit(0);
} -
在user/Makefile 文件中第152行添加
$U/_copy\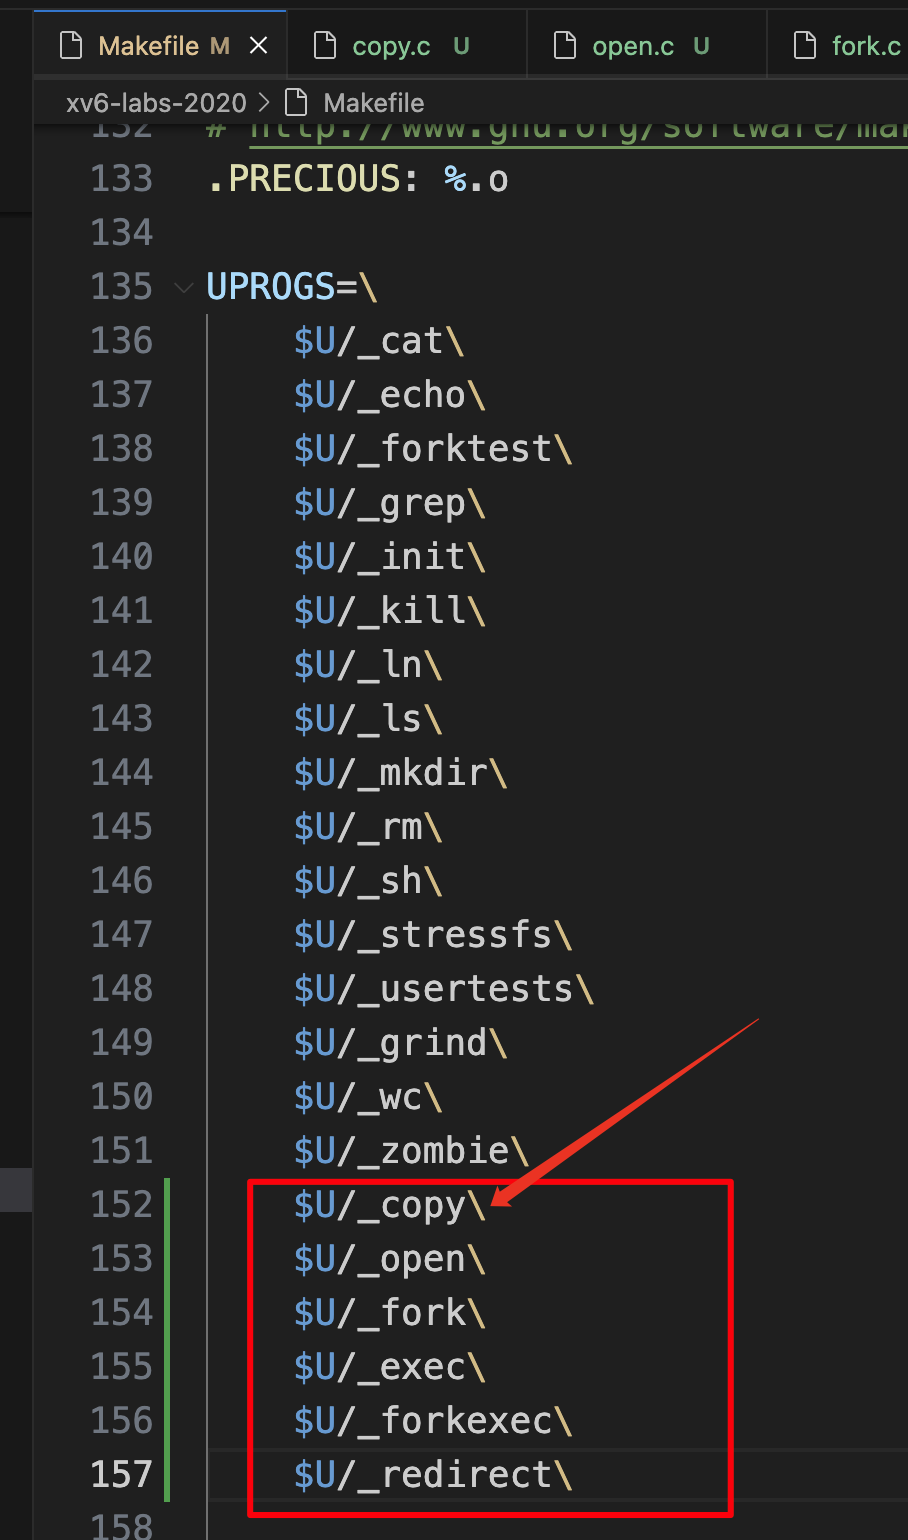
-
在xv6中输入copy
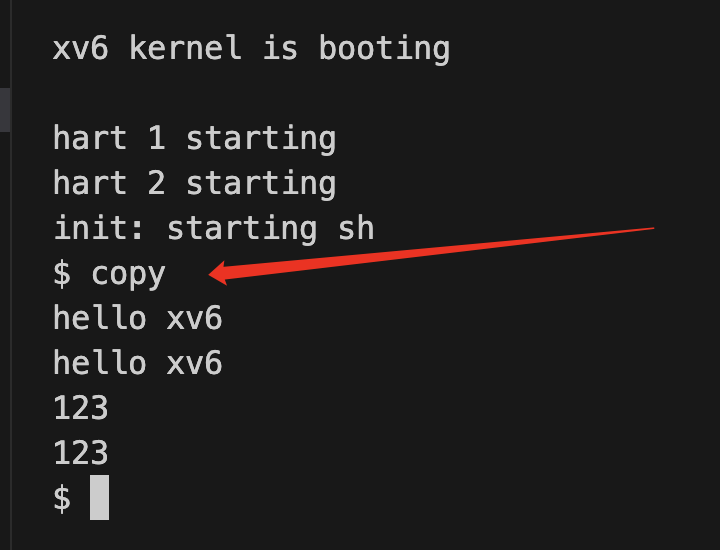
在演示了copy功能后,输入
Ctrl + d退出原理:xv6启动之后,启动了shell进程,参见源码
main(user/sh.c:145),shell fork了一个子进程然后exec(copy) -
其他example操作类似,这里只给出代码:
-
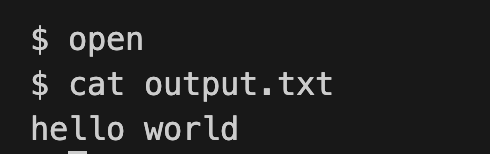
open.c
1
2
3
4
5
6
7
8
9
10
11
12
// open.c : create a file, write to it
int main() {
int fd = open("output.txt", O_WRONLY | O_CREATE);
write(fd, "hello world\n", 12);
close(fd); // 写完后应该关闭文件
exit(0);
}
-
fork.c
1
2
3
4
5
6
7
8
9
10
11
12
13
14
15
16
// fork.c : create a new process
int main() {
int pid = fork(); // 创建一个新的进程
printf("fork() returned %d\n", pid);
if(pid == 0) { // 子进程
printf("child\n");
} else { // 父进程
printf("parent\n");
}
exit(0);
}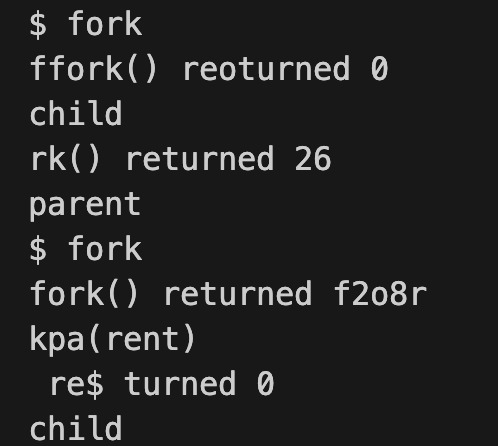
这里fork之后可能乱序是因为:父进程和子进程是并发执行的
-
exec.c
1
2
3
4
5
6
7
8
9
10
11
12
13
14
15
16
17
18
// exec.c: replace a process with an executable file
int main()
{
// argv中的第一个参数是程序名,可以任意,起作用的是exec的第一个参数,它是一个指针数组,
// 0是一个空指针,用常量NULL表示,将无法确定参数列表何时结束,如果没有0,可能导致程序尝试访问数
// 组边界之外的内存,从而引发未定义行为,包括程序崩溃或不正确的行为
char *argv[] = {"echo", "this", "is", "echo", "command", 0}; // argv[0]是程序名,可以任意
exec("echo", argv); // 将当前进程替换为 echo 命令
printf("exec failed\n");
exit(0);
}
-
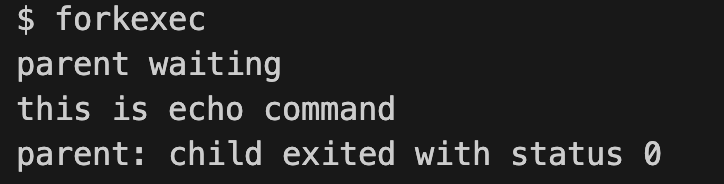
forkexec.c
1
2
3
4
5
6
7
8
9
10
11
12
13
14
15
16
17
18
19
20
21
22
23
24
25
26
27
28
29
// forkexec.c : fork then exec
int main()
{
int pid, status;
pid = fork();
if (pid == 0)
{
char *argv[] = {"echo", "this", "is", "echo", "command", 0};
// 如果这里改成exec("echoadf", argv);,则会打印:
// parent waiting
// exec failed
// parent: child exited with status 1
exec("echo", argv);
printf("exec failed\n");
exit(1);
}
else
{
printf("parent waiting\n");
wait(&status);
printf("parent: child exited with status %d\n", status);
}
exit(0);
}
-
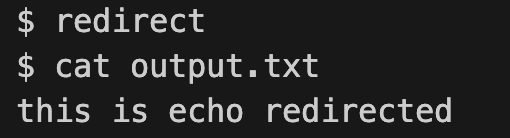
redirect.c
1
2
3
4
5
6
7
8
9
10
11
12
13
14
15
16
17
18
19
20
21
22
23
24
25
// redirect.c :run a command with output redirected
int main() {
int pid;
pid = fork();
if(pid == 0){
close(1); // 关闭标准输出
// 由于标准输出(文件描述符1)已被关闭,新打开的文件将占用文件描述符1,这实现了输出重定向
open("output.txt", O_WRONLY | O_CREATE); // 打开文件output.txt,文件描述符为1
char *argv[] = {"echo", "this", "is", "echo", "redirected", 0};
exec("echo", argv); // 执行echo命令
printf("exec failed\n");
exit(1);
} else {
wait((int *)0); // 等待子进程结束 wait返回子进程的状态
}
exit(0);
}
-
2 Lab1 Xv6 and Unix utilities
2.1 启动xv6
在课程演示中已有展示,不再赘述
2.2 sleep (难度:Easy)
题目:
实现xv6的UNIX程序
sleep:您的sleep应该暂停到用户指定的计时数。一个滴答(tick)是由xv6内核定义的时间概念,即来自定时器芯片的两个中断之间的时间。您的解决方案应该在文件user/sleep.c中提示:
- 在你开始编码之前,请阅读《book-riscv-rev1》的第一章
- 看看其他的一些程序(如***/user/echo.c, /user/grep.c, /user/rm.c***)查看如何获取传递给程序的命令行参数
- 如果用户忘记传递参数,
sleep应该打印一条错误信息- 命令行参数作为字符串传递; 您可以使用
atoi将其转换为数字(详见***/user/ulib.c***)- 使用系统调用
sleep- 请参阅kernel/sysproc.c以获取实现
sleep系统调用的xv6内核代码(查找sys_sleep),user/user.h提供了sleep的声明以便其他程序调用,用汇编程序编写的user/usys.S可以帮助sleep从用户区跳转到内核区。- 确保
main函数调用exit()以退出程序。- 将你的
sleep程序添加到Makefile中的UPROGS中;完成之后,make qemu将编译您的程序,并且您可以从xv6的shell运行它。- 看看Kernighan和Ritchie编著的《C程序设计语言》(第二版)来了解C语言。
code:
1 | // sleep.c : sleep for a few seconds |
测试:
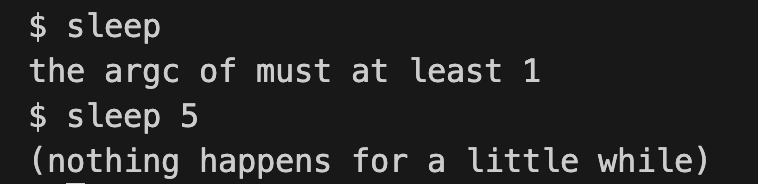
退出xv6,进入/xv6-labs-2020目录
1 | ./grade-lab-util sleep |
此处提示需要安装python环境

1 | sudo apt update |
测试结果:

2.3 pingpong(难度:Easy)
题目:
编写一个使用UNIX系统调用的程序来在两个进程之间“ping-pong”一个字节,请使用两个管道,每个方向一个。父进程应该向子进程发送一个字节;子进程应该打印“
<pid>: received ping”,其中<pid>是进程ID,并在管道中写入字节发送给父进程,然后退出;父级应该从读取从子进程而来的字节,打印“<pid>: received pong”,然后退出。您的解决方案应该在文件user/pingpong.c中。提示:
- 使用
pipe来创造管道- 使用
fork创建子进程- 使用
read从管道中读取数据,并且使用write向管道中写入数据- 使用
getpid获取调用进程的pid- 将程序加入到Makefile的
UPROGS- xv6上的用户程序有一组有限的可用库函数。您可以在user/user.h中看到可调用的程序列表;源代码(系统调用除外)位于user/ulib.c、user/printf.c和user/umalloc.c中。
思路:
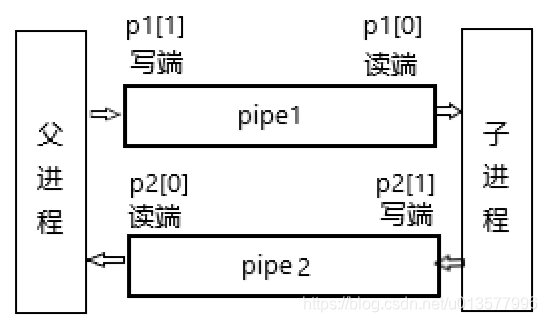
code:
1 |
|
测试:


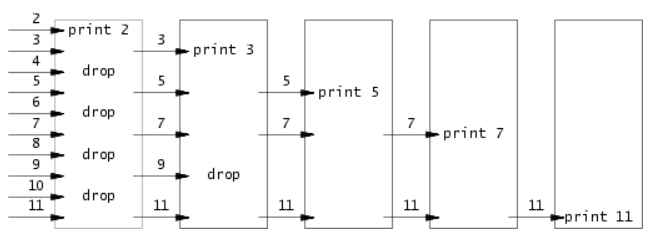
2.4 Primes(素数,难度:Moderate/Hard)
题目:
用管道编写
prime sieve(筛选素数)的并发版本。这个想法是由Unix管道的发明者Doug McIlroy提出的。请查看这个网站,该网页中间的图片和周围的文字解释了如何做到这一点。您的解决方案应该在user/primes.c文件中。您的目标是使用
pipe和fork来设置管道。第一个进程将数字2到35输入管道。对于每个素数,您将安排创建一个进程,该进程通过一个管道从其左邻居读取数据,并通过另一个管道向其右邻居写入数据。由于xv6的文件描述符和进程数量有限,因此第一个进程可以在35处停止。提示:
- 请仔细关闭进程不需要的文件描述符,否则您的程序将在第一个进程达到35之前就会导致xv6系统资源不足。
- 一旦第一个进程达到35,它应该使用
wait等待整个管道终止,包括所有子孙进程等等。因此,主primes进程应该只在打印完所有输出之后,并且在所有其他primes进程退出之后退出。- 提示:当管道的
write端关闭时,read返回零。- 最简单的方法是直接将32位(4字节)int写入管道,而不是使用格式化的ASCII I/O。
- 您应该仅在需要时在管线中创建进程。
- 将程序添加到Makefile中的
UPROGS如果您的解决方案实现了基于管道的筛选并产生以下输出,则是正确的:
2
3
4
5
6
7
8
9
10
11
12
13
14
15
16
...
init: starting sh
$ primes
prime 2
prime 3
prime 5
prime 7
prime 11
prime 13
prime 17
prime 19
prime 23
prime 29
prime 31
$
思路:参考此处
2
3
4
5
6
print p
loop:
n = 从左邻居中获取一个数
if (n不能被p整除)
将n发送给右邻居
如果你看不懂的话,那说明你需要学习一下筛法求素数:
生成进程可以将数字2、3、4、…、35输入管道的左端:第一个进程消除2的倍数,第二个进程消除3的倍数,第三个进程消除5的倍数,依此类推。
code:
1 | // primes.c : print prime numbers |
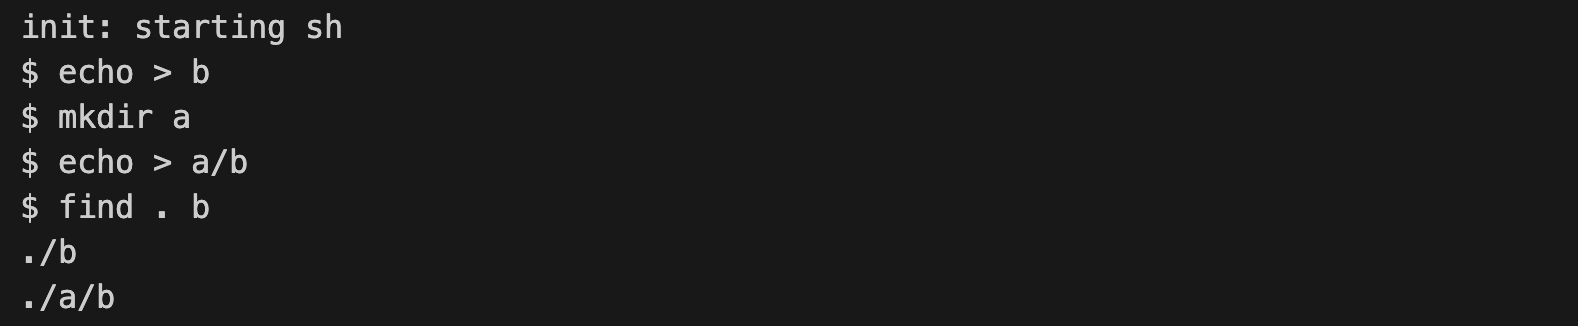
2.5 find(难度:Moderate)
题目:
写一个简化版本的UNIX的
find程序:查找目录树中具有特定名称的所有文件,你的解决方案应该放在user/find.c提示:
- 查看user/ls.c文件学习如何读取目录
- 使用递归允许
find下降到子目录中- 不要在“
.”和“..”目录中递归- 对文件系统的更改会在qemu的运行过程中一直保持;要获得一个干净的文件系统,请运行
make clean,然后make qemu- 你将会使用到C语言的字符串,要学习它请看《C程序设计语言》(K&R),例如第5.5节
- 注意在C语言中不能像python一样使用“
==”对字符串进行比较,而应当使用strcmp()- 将程序加入到Makefile的
UPROGS如果你的程序输出下面的内容,那么它是正确的(当文件系统中包含文件b和a/b的时候)
2
3
4
5
6
7
8
9
10
...
init: starting sh
$ echo > b
$ mkdir a
$ echo > a/b
$ find . b
./b
./a/b
$
主要看懂user/ls.c的源码即可
code:
1 | // find.c : find files with a specific name |
测试:

2.6 xargs(难度:Moderate)
题目:
编写一个简化版UNIX的
xargs程序:它从标准输入中按行读取,并且为每一行执行一个命令,将行作为参数提供给命令。你的解决方案应该在user/xargs.c下面的例子解释了
xargs的行为
2
3
bye hello too
$注意,这里的命令是
echo bye,额外的参数是hello too,这样就组成了命令echo bye hello too,此命令输出bye hello too请注意,UNIX上的
xargs进行了优化,一次可以向该命令提供更多的参数。 我们不需要您进行此优化。 要使UNIX上的xargs表现出本实验所实现的方式,请将-n选项设置为1。例如
2
3
4
line 1
line 2
$提示:
- 使用
fork和exec对每行输入调用命令,在父进程中使用wait等待子进程完成命令。- 要读取单个输入行,请一次读取一个字符,直到出现换行符(‘\n’)。
- kernel/param.h声明
MAXARG,如果需要声明argv数组,这可能很有用。- 将程序添加到Makefile中的
UPROGS。- 对文件系统的更改会在qemu的运行过程中保持不变;要获得一个干净的文件系统,请运行
make clean,然后make qemu
xargs、find和grep结合得很好
将对“
.”下面的目录中名为b的每个文件运行grep hello。要测试您的
xargs方案是否正确,请运行shell脚本xargstest.sh。如果您的解决方案产生以下输出,则是正确的:
2
3
4
5
6
7
8
...
init: starting sh
$ sh < xargstest.sh
$ $ $ $ $ $ hello
hello
hello
$ $你可能不得不回去修复你的
find程序中的bug。输出有许多$,因为xv6 shell没有意识到它正在处理来自文件而不是控制台的命令,并为文件中的每个命令打印$。
code:
测试:
 wechat
 alipay